
Last updated on May 8th, 2025 at 01:21 pm
GeForce Experience is the name of the program that is made available by Nvidia. The configurations of games may be improved with the help of this program, which is designed to optimize them for Windows 10.
This is accomplished by the program searching for games that have been installed on the system, and then automatically optimizing those games while they are played on the system.
You can add Roblox to GeForce Experience in the same manner that you add games to the platform.
Roblox is now accessible on GeForce Experience, although the only version of the program that can be downloaded is the Windows 10 edition.
How to add Roblox to GeForce Experience
Short Answer: To add Roblox to GeForce Experience you can perform a scan or add Roblox manually using the ‘Add Button’ in Nvidia GeForce.
There is no guarantee that GeForce Experience will make your gaming experience better.
While it may not enable them to achieve a higher frame rate, some players report that it makes their gameplay experience more enjoyable overall.
It’s possible that it won’t function as well with games that aren’t compatible, but that’s to be anticipated.
Assuming you own a graphics processing unit (GPU) made by Nvidia, you are eligible to download and set up the free software known as Nvidia GeForce Experience.
After it has been downloaded, it will look for games that are compatible with it and add those games to a set of titles that it is going to optimize.
When it is unable to locate a game, you have the option of manually adding it.
The following are some of the ways in which you may be able to incorporate Roblox into your GeForce Experience:
Method 1: Perform a force scan
-
Step 1: Launch the Nvidia GeForce Experience application.
-
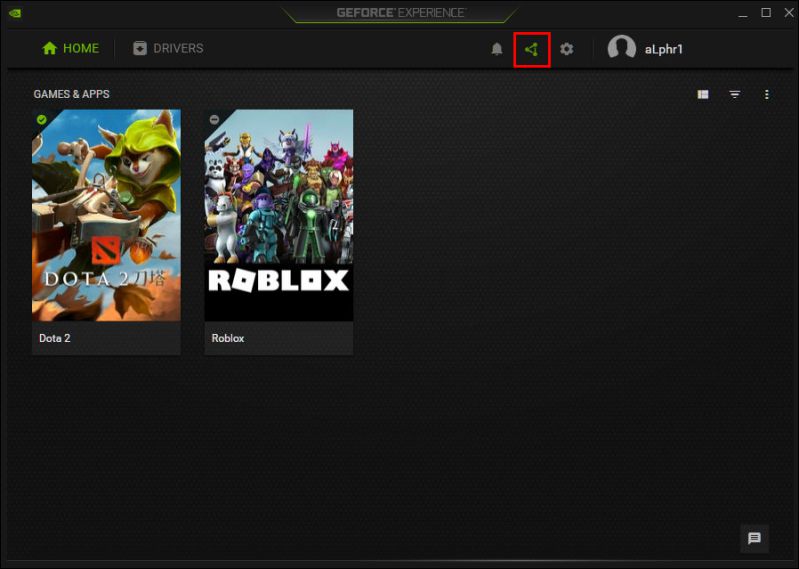
Step 2: Click the three dots button on the upper right corner
When you are on the Home screen of the app, click the button that looks like three dots (more choices) that is located in the upper right corner.
-
Step 3: Make sure the Optimize all games option is selected.
-
Step 4: Click that button once again and select “Scan for games”
After that, pick “Scan for games” from the menu that appears when you click that button once again.
Please wait while the scan completes. Roblox will be shown on the Home screen for you to play after they have been discovered.
-
Step 5: Select Roblox from the list of games shown
Select Roblox from the list of games shown on the Home Screen.
Games that have a tick in a green checkbox next to their name are compatible with GeForce Experience.
Method 2: Manually add Roblox
In order to manually add Roblox to GeForce Experience, you will need to provide the application with the location of the game’s installation folder.
-
Step 1: Launch GeForce Experience as a first step.
-
Step 2: Click on the additional choices option
On the top right, you will see a button that looks like three dots and says “additional choices.” Click on this icon.
-
Step 3: Choose “Optimize all Games”
Choose “Optimize all Games” from the menu to complete this step.
-
Step 4: Tap on the button that looks like a cogwheel
On the very top, there is a button that looks like a cogwheel. Tap on it.
-
Step 5: Choose the Games tab
Choose the Games tab located in the column on the left side of the screen.
-
Step 6: Select the Add button located in the labeled Scan Location.
-
Step 7: Choose the folder where Roblox was installed
Choose the folder where Roblox was installed to access the game.
-
Step 8: Select the “Scan Now” button.
Wait for the scan to complete before moving on to the Home tab. Roblox will appear in that section.
Method 3: Using the GPU Control Panel, manually add Roblox
In the event that the procedures described above do not provide the desired results for you, you may use this workaround to install and play Roblox on your GeForce.
-
Step 1: Navigate to the Control Panel for your GPU.
-
Step 2: Select Nvidia settings by clicking on it.
The Nvidia Control Panel will open when you click the button.
-
Step 3: Select Set PhysX Configuration
Select Set PhysX Configuration from the menu that appears under 3D Settings.
-
Step 4: Finally, under “Select a PhysX processor”, choose the GeForce version
-
Step 5: Go to the Manage 3D Settings option
Within the 3D Settings menu, go to the Manage 3D Settings option.
-
Step 6: Choose the option labeled “Global Settings.”
-
Step 7: Choose High Performance Nvidia Processor as your preferred graphics processor
-
Step 8: Select the “Apply” button.
-
Step 9: At this point, pick the tab labeled Program Settings.
-
Step 10: Locate the Add option and choose it from the menu.
-
Step 11: Click the Browse button.
-
Step 12: Navigate to the directory where your Roblox files are stored.
-
Step 13: Navigate to the location of the file
Navigate to the location of the file, then right-click on the RobloxPlayerBeta.exe file and choose Open.
-
Step 14: Select High Performance Nvidia Processor as your preferred graphics processor.
Check to verify that the High-Performance Nvidia Processor option is chosen for the graphics processor that you like.
-
Step 15: Select the “Apply” button.
There is a possibility that Roblox can now be added to and operate on GeForce Experience.
That’s it.
Once Roblox is added on Nvidia GeForce Experience, you will be able to use the power of GeForce to enhance your performance. Other that the gameplay improvements, you will be able to use Nvidia features like Game Filters.
Subscribe to our Youtube Channel. Follow us on Twitter & like our Facebook page for more post-updates.
- Fix: Nvidia Geforce Game Ready Driver installation failed
- Roblox ODer meaning, guide to stop OD
- How to play Da Hood Roblox
- How to play Roblox on TV

Hi, I’m Ankit Kumar, the founder of StealthyGaming. I handle everything from SEO to researching and writing gaming articles. I’m passionate about helping fellow gamers stay updated with the latest tips, guides, and news. When I’m not optimizing content, I’m probably testing out new games or digging into strategies to make my articles as helpful and engaging as possible.