
In this guide, we’ll focus on troubleshooting the NVIDIA FPS counter, an integrated feature of the GeForce Experience software.
To utilize this, you’ll need an NVIDIA graphics card and the GeForce Experience application installed on your PC. GeForce Experience offers a convenient FPS tracker overlay for your games, which can be activated by enabling the In-Game Overlay in the settings and customizing the HUD layout.
While this tool is straightforward and doesn’t provide extensive statistics like some third-party applications, it’s an excellent, unobtrusive solution for quickly monitoring your game’s performance.
However, if you’re encountering issues with the NVIDIA FPS counter not appearing, follow along for helpful solutions.
Why is Nvidia performance overlay not showing FPS
Short Answer: The NVIDIA performance overlay might not be showing FPS due to several reasons, including misconfigured settings in the GeForce Experience, conflicts with in-game overlays, insufficient permissions, or outdated graphics drivers.
To fix this, ensure that the in-game overlay is enabled in GeForce Experience settings, disable any game-specific FPS counters, run GeForce Experience as an administrator, and check for any driver updates through the NVIDIA website or the GeForce Experience app.
Fix: Nvidia FPS counter not showing
Before You Begin
- Verify that your GPU is NVIDIA (sounds obvious, but many readers forget).
- Check that GeForce Experience is actually installed and updated.
- Make sure your game is running in fullscreen or borderless mode, since some overlays don’t appear in windowed mode.
Method 1: Turn on the FPS Counter
- Run GeForce Experience as Administrator: This ensures the software has the necessary permissions. Find the GeForce Experience shortcut, right-click, and select “Run as Administrator.”
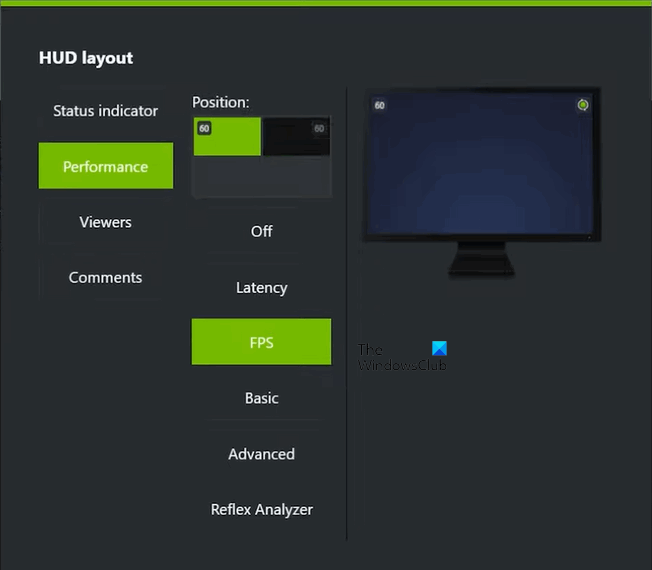
- Navigate to Overlay Settings: In the GeForce Experience, go to “Settings” > “General” > “In-Game Overlay” > “HUD Layout” > “FPS Counter.” This path leads you to the overlay settings, where you can activate the FPS display.
- Choose Counter Position: You’ll see four quadrant options representing different screen positions. Select where you’d like the FPS counter to appear. Once set, the FPS should display in your chosen location during gameplay.
Method 2: Update Graphics Drivers
- Access Device Manager: Use the Start menu or the Run dialog (Windows Key + R, then type “devmgmt.msc”) to open the Device Manager.
- Uninstall & Update NVIDIA Card: Find your NVIDIA card under “Display Adapters,” right-click and select “Uninstall Device.” Then, visit NVIDIA’s website to download and install the most recent driver for your card, ensuring optimal performance and compatibility.
Method 3: Disable Integrated Graphics
- Disable in Device Manager: Navigate to “Display Adapters” in the Device Manager. Right-click your integrated graphics card (often an Intel or AMD entry) and select “Disable Device.” This forces your system to use the NVIDIA card, potentially resolving conflicts.
- Reboot and Check: After disabling, reboot your PC and check the NVIDIA Control Panel for any changes or reappearances of missing options.
Method 4: Select Default Graphics Processor in BIOS
- Access BIOS: Restart your PC and press the BIOS key indicated on the boot screen (commonly F1, F2, or Del).
- Locate Graphics Settings: Within BIOS, find the Advanced tab or equivalent where graphics settings are located. This varies by manufacturer, so you may need to look under names like “Internal Graphics,” “Video Configuration,” or “North Bridge Configuration.”
- Change Primary Video Controller: Find the setting controlling the primary graphics device (names vary). Change it to prioritize your NVIDIA card (options might be GFX0, PEG, PCI, or AGP, depending on your connection type). Save and exit to apply changes.
Method 5: Restart Nvidia Control Panel Process
- Open Task Manager: Use Ctrl + Shift + Esc to access Task Manager. For a more detailed view, click “More details” at the bottom.
- End Nvidia Control Panel Process: Look for Nvidia Control Panel under the “Background processes” section, select it, and click “End task” to stop it.
- Relaunch and Check: Reopen the Nvidia Control Panel to see if the previous issues have been resolved. This can often fix temporary bugs or glitches.
Method 6: Disable In-Game FPS Counter
- Find Game-Specific Settings: Open the settings menu in your game. The FPS counter is usually located under the “Display” or “Graphics” settings.
- Disable FPS Counter: Turn off the game’s built-in FPS counter. This helps to prevent conflicts between the game’s overlay and NVIDIA’s overlay, ensuring the NVIDIA FPS counter can operate correctly.
Method 7: Check for Conflicting Software
Some third-party software, like screen recording tools, other overlays (e.g., MSI Afterburner, RivaTuner), or even antivirus programs, can interfere with Nvidia’s Performance Overlay.
Users should try disabling or uninstalling these programs temporarily to see if the FPS counter appears.
Disable any third-party software that might conflict with GeForce Experience, and try running your game again.
Bonus Tips:
8. Enable Performance Overlay
In “Settings” > “General” > “In-Game Overlay,” ensure “Performance Overlay” is on and “FPS” is checked.
Toggle Overlay: Try disabling and re-enabling the overlay to resolve display issues.
9. Disable Conflicting Counters
Turn off any in-game FPS counters and check game forums for specific advice.
10. Restart as Administrator
Exit GeForce Experience, then relaunch it as an administrator to ensure proper permissions.
11. Clean Reinstall
Uninstall and reinstall GeForce Experience for a fresh setup.
12. Ensure DirectX and Visual C++ are Updated
13. Check Windows Game Mode Settings
Go to Settings > Gaming > Game Mode and try toggling Game Mode off to see if it resolves the issue.
14. Monitor Refresh Rate Issues
If you have set a custom refresh rate for your monitor, it might conflict with overlays.
Reset your monitor’s refresh rate to its default setting via the Nvidia Control Panel under Change resolution > Refresh rate.
15. Windows Display Settings
Ensure that your display scaling is set to 100% (default) and that your resolution matches your monitor’s native resolution.
Adjust these settings via Settings > System > Display.
Follow us on Twitter & like our Facebook page for more post-updates
Check out more NVIDIA Articles –

An experienced gaming content writer who emphasizes on offering the most recent information and how-to tutorials for the trending titles. Being a Hardcore gamer himself, he likes to try an array of games and likes to spend his time exploring them. He likes to unwind by listening to R&B music when he’s not writing about gaming stuff.