Last updated on January 2nd, 2023 at 05:20 pm
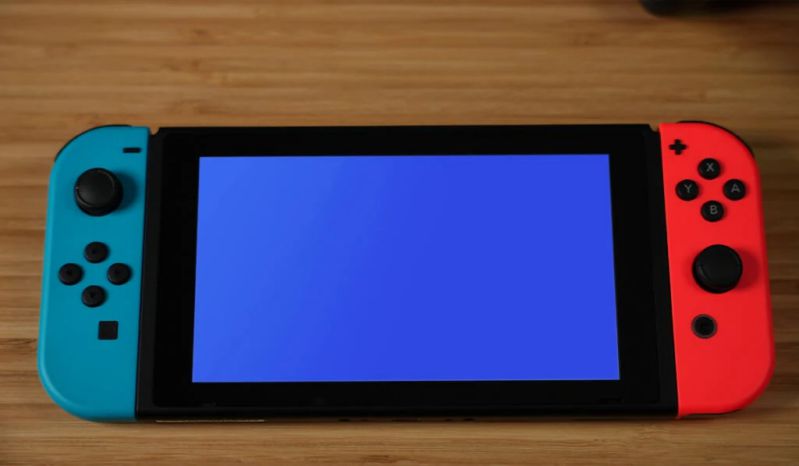
If you’re looking for a gaming system, Nintendo Switch is up there with the best of them. The Nintendo Switch Lite blue screen is something that some Switch owners may have experienced.
Having this gorgeous, polished console unexpectedly brick itself when it is undocked may be quite unpleasant, but that is essentially what is occurring with the blue screen. If the thought of paying a repair bill has already started to upset you, keep in mind that, based on when you purchased the Switch, the necessary maintenance may be free of charge.
The Nintendo Switch Lite’s blue screen bug is an incredibly frustrating glitch. These suggestions, fortunately, will speed up the process of troubleshooting and fixing the issue.
What causes the Nintendo Switch Lite blue screen issue?
Short Answer: You are facing the blue screen on your Nintendo Switch Lite due to internal damage, games with corrupt data, or unsupported third-party docks.
There are hundreds of games available on the Nintendo Switch, ranging from action/adventure games to first-person shooters to role-playing games and strategy titles (RPG). The device has various bugs, including the blue screen issue that plagues the Nintendo Switch and other gaming consoles.

Although it has a scary sounding term, the screen issue may be resolved quickly and painlessly if the root reasons are identified. The process of troubleshooting and fixing a malfunctioning screen is simplified when the contributing components causing the problem are known. If your Switch console has suddenly crashed, here are some possible causes:
1. Damage to the inside
The Switch is easily transportable, but its little size also makes it more vulnerable to accidental damage. Something might be rattled loose on the inside of your Nintendo Switch if it was dropped or otherwise subjected to hard treatment.
Problems with the screen’s display may occur because of how easy the interior components come loose. Blue screen displays are one sign of a broken Switch LCD.
2. Games with faulty data
Many Switch gamers load their consoles up with a tonne of extra content to get the most out of their gaming sessions. This data improves the Switch in every way, from new games and applications to updates. In the event that any of these items hold corrupt information, the computer may crash and display a blue screen.
3. Third-party Docks that are unsupported
Employing a third-party dock might cause the Switch to crash, according to several gamers. Most available docks are compatible with Switch systems. However, while using an unsupported third-party dock, you may get the dreaded blue screen.
Fix: Nintendo Switch Lite blue screen issue
Method 1: Reboot your Nintendo Switch
The first step in repairing the blue screen is to restart your console. In most cases, powering down the Nintendo Switch completely will fix minor problems.
If the Nintendo Switch is permanently set to Blue, you may force it to turn off by pressing and holding the “Power Button” for 12 seconds.
After it has been turned off, a second push of the power button will turn it back on.
Method 2: Hard-Reset the Nintendo Switch
A blue screen may be fixed by doing a hard reset on your Nintendo Switch Lite. Remember that this fix will remove everything from your device except for your saved data, screenshots, videos, and personal details. To get started, follow the steps given below-
- Step 1: Forcibly shut down your switch.
If your Nintendo Switch is frozen at the Blue Screen, you may force it to shut down by pressing and holding the “Power” button for 12 seconds.
- Step 2: Turn the device back on.
To turn the device on, click the power button while holding down the volume up (+) and volume down (-) buttons simultaneously.
- Step 3: Boot switch in recovery mode.
To enter recovery mode, keep pressing and holding the volume up (+) and volume down (-) buttons.
- Step 4: Select the “Factory Setting Without Deleting Saved Data” option.
You have to keep in mind that this will take some time. Once again, this will remove anything except your own details, saved data, videos, and screenshots.
Method 3: Initialize your Console in Maintenance Mode
The blue screen issue on a Nintendo Switch Lite may be remedied by starting the system up in maintenance mode. In contrast to a factory reset, none of your data will be lost in this process.
To begin, your console must be put into maintenance mode. You can follow the steps below to do so:
- Step 1: Turn off your Nintendo Switch.
In order to turn off your Nintendo Switch, press and hold the power button for a few seconds.
- Step 2: Turn the device back on.
To turn the device on, click the power button while holding down the volume up (+) and volume down (-) buttons simultaneously.
- Step 3: Boot switch in recovery mode.
Keep pressing and holding the volume up (+) and volume down (-) buttons to enter recovery mode.
- Step 4: Now, click on ‘Initialize Console Without Deleting Save Data’.
- Step 5: When you reach the next page, choose the “Next” button.
- Step 6: Select ‘Initialize Console Without Deleting Save Data’ to approve the process.
- Step 7: Reboot your Switch now.
If you attempt to go into maintenance mode on your switch and it does not work and instead returns to the blue screen, you should try hitting the power button first. After then, let go of the power button as soon as the Nintendo logo appears, and continue holding down the volume buttons until the maintenance mode menu appears on the screen.
Method 4: Upgrade your System Software
Unfortunately, you can’t upgrade the system software from the settings panel, thus you’ll have to use the recovery/maintenance mode menu once again. Once again, this does not apply to you if you were unable to boot your console into maintenance mode.
Therefore, in order to enter maintenance mode on your Nintendo Switch, please complete the steps outlined above.
Click the “Update System” button once you are there. A loading window with the text “Preparing to update system” will appear. Go ahead and upgrade to the latest version of the program if one is offered.
Method 5: Try Docking or Undocking Your Console
In the event that the Blue Screen appears on your Nintendo Switch Lite, docking and undocking the console may help. Hook up your gadget at the dock, if you’re playing on a portable Nintendo Switch.
You might try unplugging the console from the TV if it is currently docked. This will cause your Switch to pause its usual processing and allow it to adapt.
Method 6: Reboot the Device
If you’ve exhausted all other options for fixing the console and it still isn’t working, try taking the battery out and turning it off completely. Take the console away from your home and leave it on the blue screen without plugging in the power or the HDMI cord.
When the power finally runs out, it’s time to connect the adapter and get your gaming console back up and running. If you believe the screen issue has been fixed, try turning on the Switch.
Method 7: Restore the Console to Factory Settings
If none of the obvious solutions work, you may always wipe the console and start again. This approach should only be used as a last option, and you should be aware that all your game progress, screenshots, and other stored files will be deleted.
You may return your console to its original settings by pressing and holding the power button for 12 seconds. Holding down the plus (+) and minus (-) volume buttons simultaneously will turn on the device (-).
Recovery mode is accessed by releasing the power button but keeping the volume buttons held down. Locate the option to “Restore Factory Settings” and then remove all console data. Verify whether the display issue has been resolved.
Method 8: Get in touch with Nintendo Switch Support
Unfortunately, internal damage is the root cause of the Nintendo Switch Lite blue screen issue. The Switch’s CPU might get dislodged and malfunction if it is dropped on the floor.
If the aforementioned steps don’t work, you should mail your Nintendo Switch to the company’s support team. The Nintendo Switch official site is where you may get in touch with the company for help.
Another option is to take it to a Nintendo switch repair shop in your area. Keep in mind that sending your console in for repairs might result in the loss of all of your saved games, screenshots, and other data. Before mailing in your Nintendo Switch, please make sure that all microSD cards and game cards have been removed.
Follow us on Twitter & like our Facebook page for more post-updates.

Abhigyan identifies himself as a tech geek, gaming cognoscenti, and also a connoisseur of music. Unidentified and mysterious phenomena never fail to gather his undivided attention. When not reading about bizarre and perplexing entities across the Universe, he can often be found cheering for his favorite teams in Football.


