
Minecraft is a Lego-style role-playing video game in which you may design and build your own universe. The initial focus of the game was on your avatar erecting blocks in self-defense against monsters, but it was expanded to incorporate a number of additional elements.
This has become a timeless classic with a variety of unique traits throughout time. You have a limitless quantity of resources at your disposal when in Creative mode, allowing you to construct whatever you desire. You’ll be able to travel to new worlds and discover new planets in Survival mode.
To prepare for a monster onslaught, you can construct a fortress or gather weapons.
Minecraft players, rejoice! We’ve produced a list of 15 amazing games like Minecraft for you that are popular among elementary school children.
More material was added on a regular basis as the game developed. Minecraft users have a multitude of options for personalizing and customizing the game.
This game may be played on a number of different devices and platforms. Popular gaming platforms include the PlayStation 3, Nintendo Wii, Xbox 360, PC, smartphone, iPad, and Raspberry Pi.
You may interact with and even affect the Terabyte universe in Minecraft. The following list of ecological phenomena is by no means complete. Today, we are going to discuss about How to port forward a Minecraft server. So, Let’s get started.
How to port forward a Minecraft server
It requires considerable effort and technical skills to set up a server. If you don’t have some fundamental computer and networking skills, don’t try to set up a server. Probably your best choice is to seek for a guide on how to set up a server on the Internet.
A Minecraft server doesn’t have to be a high-end laptop, although netbooks and notebooks aren’t ideal for running the game. In comparison to desktop computers, they usually feature lower-end hardware and poor I/O performance.
If your computer is strong enough, you can also host and play on the same system.
In a wireless network (WLAN and especially WWAN), having a large number of participants is not advised. Instead, use a wired network, such as Ethernet. Check out the public server alternatives on a Minecraft server listing website if you don’t want to host but still want to play online.
Check out the Minecraft server hosting section of the Minecraft Forum or other websites if you still want to administer a server but not from home. Because free hosting is rare, expect to pay monthly for this sort of server, but you’ll save the burden of continually maintaining a server and ensuring it’s always available for your gamers.
You should be informed of the potential threats as you’re about to operate your own server. Following the instructions below should not put you in any danger, but because this is a wiki that anyone can edit and we don’t know your system settings, we can’t guarantee you’ll be completely safe.
-
STEP 1 – Create a server folder and download the JAR file
Create a new folder in whichever directory you want; this is where all of the server files will be downloaded and executed from. The official Minecraft Server.jar file may be downloaded here. It should be saved to the server folder you just made.
-
STEP 2 – Create your run script
You’ll need a script to launch the.jar file in order to really host the server. Copy and paste the following command into a new text file:
java -Xmx1024M -Xms1024M -jar minecraft_server.1.16.4.jar nogui
The current Minecraft server version available at the time of writing is Minecraft server.1.16.4.jar. If a new version is available, just replace this with the name of the.jar file you previously downloaded.
The -Xmx and -Xms options are used to allocate the server’s memory. You can raise these numbers if you wish to (in multiples of 1024). Save this file as run.bat if you’re using Windows. Save this file as run.sh if you’re using Linux. Ensure that the file’s extension is not.txt so that it may be properly run.
-
STEP 3 – Run the script
Simply double-click the freshly formed run.bat file if you’re using Windows. If you’re using Linux, you’ll need to make the file executable first. Run the command chmod +x run.sh first. This allows you to run the script you just wrote. The script may then be run with./run.sh.
-
STEP 4 – Accept EULA instructions
Following the execution of the script, a warning about accepting the EULA agreement will appear. Close this window, and you’ll see that a number of new files have been formed in the server folder. Change the line eula=false to eula=true in the file eula.txt, then save and shut the file.
-
STEP 5 – Test the server
You may now execute the script to restart the server after the EULA agreement has been approved (run.bat or run.sh). More new files should have been produced in the server folder. You can test your server once the configuration is complete and the world has been produced.
Open Minecraft and select multiplayer from the menu. Enter localhost in the server address bar and click Connect. You now have your own Minecraft server, which is fantastic! But now that you want to play with your pals, you’ll need to allow inbound connections to the server.
-
STEP 6 – Find internal and external IP addresses
In order to port forward in the following step, you’ll need your internal (private) IP address, and you’ll need your external (public) IP for other people to connect to your server.
By putting cmd into the search bar and pressing enter, you may access the command prompt. You can view a list of Wi-Fi cards and Ethernet adapters by using the command ipconfig.
Open a terminal using ctrl + alt + t if you’re using Linux. You can view a list of Wi-Fi cards and Ethernet adapters by using the command ifconfig. Look for the IPv4 Address (which starts with 192.168) under your internet connection type, depending on how you connect to the internet (Wi-Fi or Ethernet). This is your private IP address.
To discover your external IP address, simply Google “my IP” and it will provide your public IP address. Alternatively, you may use https://whatismyipaddress.com/ to find out your public IP address.
-
STEP 7 – Port forward your server
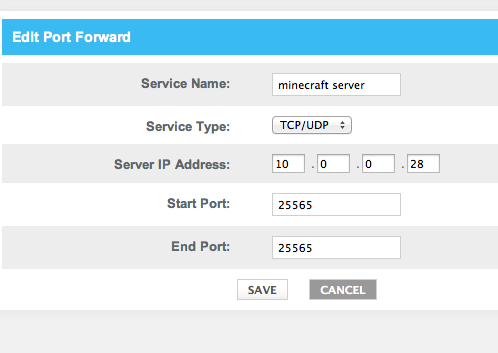
The technique of opening a certain port on your local network so that incoming traffic may connect to a service is known as port forwarding. In this scenario, we’ll use port 25565, which is the normal Minecraft port.
You must have admin access to your local network in order to port forward. By entering 192.168.1.1 into a web browser, you may access many home routers.
Look for the “port forwarding” options after entering the admin credentials. This is normally found under “advanced options,” “advanced setup,” or “networking.” Port forwarding, for example, is located under “Advanced” -> “Advanced Setup” -> “Port Forwarding/Port Triggering” on a NetGear router.
You’ll want to click “Add Custom Service” here. Give the service a name that is easily remembered, such as “Minecraft Server.” Make sure TCP/UDP is chosen under service type. Enter the default Minecraft port “25565” for both the internal and exterior port ranges.
Finally, input the private IP address that you discovered in the previous step for the internal IP address. After you click apply, your changes will be stored.
-
STEP 8 – Edit the server configuration files
Scroll down to server-port and server-IP in the server.properties file with your text editor of choice. Assign server-port to the port you just created for port forwarding and server-IP to your internal (private) IP address.
These two fields should look like:
server-port=25565
server-ip=192.168.1.88
Other Minecraft settings, such as difficulty, game mode, and PvP, can also be changed in this file. Save and close this file once you’ve finished making all of your changes.
-
STEP 9 – Test the public server IP of your server
Now that the port is open for communication and the settings are correct, restart the server by double-clicking the run.bat file (Windows) or typing./run.sh (Mac) (Linux).
Once the server has done loading, you may check to see whether it works by using the public IP address you discovered in step #7. Voilà! You and your friends may now connect to the server by using the same public IP address in their Minecraft applications.
You should now be able to join your server and invite your friends to do the same. Simply tell them what hostname you’re using and what port number you’re using. “hostname.domain.com:25565,” for example.
You may remove the port number from the end of the server by adding an SRV record if you’re using Enhanced Dynamic DNS and/or Plus Managed DNS with your own domain name.
You may also check to see whether any of your network’s devices support No-IP for Integrated Dynamic DNS updates. Routers and camera systems are examples of devices that use No-IP for Dynamic DNS. This eliminates the requirement for the Dynamic Update Client to be downloaded.
That’s all for today’s article on How to port forward a Minecraft server. Do check out all the sections and know you should know which games are best for dancing. Till then, stay safe and follow us for more upcoming gaming coverage.
Follow us on Twitter & like our Facebook page for more post-updates
- Top 14 Best Roblox Minecraft Games
- Top 15 Best Games like Minecraft for Android/ iOS
- Fix: Minecraft store not working 2021

An experienced gaming content writer who emphasizes on offering the most recent information and how-to tutorials for the trending titles. Being a Hardcore gamer himself, he likes to try an array of games and likes to spend his time exploring them. He likes to unwind by listening to R&B music when he’s not writing about gaming stuff.