
Last updated on February 21st, 2022 at 01:31 am
Minecraft is a Lego-inspired role-playing video game in which you may design and construct your own universe. In addition to your avatar erecting blocks in self-defense against monsters, the game has evolved to include a variety of additional components.
This is a timeless classic with several distinguishing features. When you’re in Creative mode, you have access to an infinite amount of resources, allowing you to build whatever you want. You’ll be able to travel to new worlds and discover new planets in Survival mode.
To prepare for a monster onslaught, you can build a castle or gather weapons.
Players of Minecraft, rejoice! For you, we’ve compiled a list of 15 amazing games like Minecraft that are popular among elementary school students.
As the game evolved, more content was frequently introduced. Minecraft users have a multitude of options for personalizing and customizing the game.
This game is compatible with a variety of devices and platforms. Popular gaming systems include the PlayStation 3, Nintendo Wii, Xbox 360, PC, smartphone, iPad, and Raspberry Pi.
You may interact with and even affect the Terabyte universe in Minecraft. This is only a tiny sample of ecological phenomena; the list is far from exhaustive. Today, we are going to discuss How to repair Enchanted items in Minecraft. So, Let’s get started.
How to repair Enchanted items in Minecraft
In Minecraft, there are two ways to repair items: with and without an Anvil. By combining two damaged objects of the same type on a crafting grid, things like weapons, armor, and tools can be restored.
-
STEP 1 – Merge two items into one
The two things will be merged into a single item with the same durability as the two-plus a slight boost (thus both items should be utilized until they are below 45 percent durability to receive the greatest value from the repair). When restoring objects in this manner, any enchantments will be lost.
-
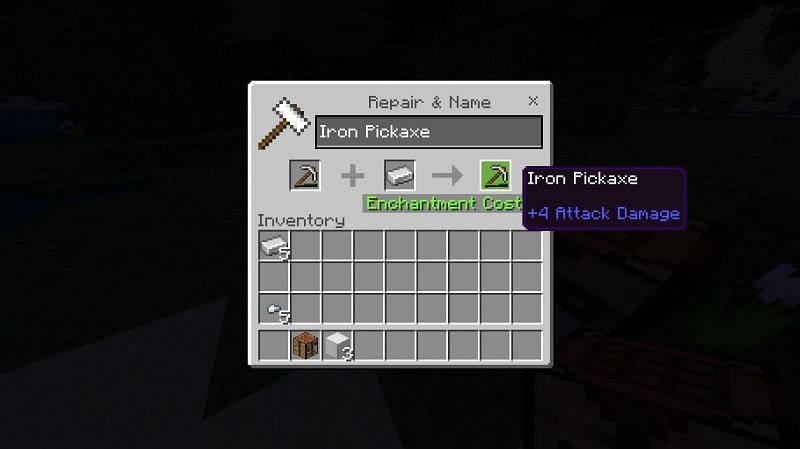
STEP 2 – Rename your created item
At the expense of experience points, anvils enable you to rename objects, repair enchanted items, and even combine the enchantments of several items. Place two charming objects of the same sort on the left, and their enchantments will be merged to create a new item, if feasible.
-
STEP 3 – Add Enchantment levels
Some combos aren’t feasible; for example, you can’t have both Sharpness and Smite on the same blade. Enchantment levels can be added; for example, two Bows with Power I can be combined to create one with Power II.
-
STEP 4 – Place the anvil first
The sequence in which the two objects are placed matters: the anvil takes the first item and, if feasible, adds enchantments and durability from the second. This has an impact on the price, so test it both ways.
Anvils are used to transmit enchantments from enchanted books to items; simply set the item and the book in the slots. On an anvil, two charming books can be joined to create a new book containing both enchantments.
-
STEP 5 – Check the cost of repair
The cost of repair is determined by a variety of criteria, including the number of times the object has been altered with the anvil. No operations with a cost of more than 40 experience levels are permitted. You will only be able to fix your equipment a few times as a result of this.
-
STEP 6 – Remove your Enchantment item
You may also remove Minecraft enchantments from an item by placing it in one of the two slots before activating it. This will erase all non-curse enchantments and reward you with a small amount of experience for each one you remove.
It’s worth noting that removing enchantments from an item will happen even if you don’t want it to. To put it another way, make sure you take care of your belongings and don’t unintentionally disenchant your favorite blade or pickaxe.
-
STEP 8 – Create a grindstone and use it
Using the Grindstone also removes any previous labor penalties that the item may have accumulated. This is the method that makes working on things with Anvils more costly, therefore it’s a nice way to effectively refresh the tool into which you’ve placed it.
The Grindstone is a great tool for maintaining your things in top form – it’s a must-have for any aspiring blacksmith – but you should be aware of the risk of destroying your enchantments.
How to craft a Minecraft Grindstone
You’re not alone if you frequently get lost when it comes to Minecraft’s most critical features. Every new update delivers something new and interesting, but keeping up with everything may be difficult.
The Grindstone is a relatively new item in Minecraft, so you may not be familiar with it if you’ve been gone from the game for a long. If that’s the case, the Grindstone is a fantastic tool for repairing weapons and removing enchantments.
This Minecraft Grindstone tutorial is for introducing or renewing your understanding of this useful item. So, let’s get caught up on how to get the most out of this new toy.
Two Sticks, two Wooden Planks, and a Stone Slab are required to make a Grindstone in Minecraft. All of those are rather simple to obtain. Wood, which is abundant in all but the hardest Minecraft environments, can be used to construct both Sticks and Wooden Planks.
Three pieces of stone are all that are required for the Stone Slab, which will provide six Stone Slabs. If you’ve never manufactured Stone before, just heat up some Cobblestone pieces in a Furnace. You may make the Grindstone once you have all of the components.
That’s all for today’s article on How to repair Enchanted items in Minecraft. Do check out all the sections and know you should know which games are best for dancing. Till then, stay safe and follow us for more upcoming gaming coverage.
Follow us on Twitter & like our Facebook page for more post-updates
- Top 14 Best Roblox Minecraft Games
- Top 15 Best Games like Minecraft for Android/ iOS
- Fix: Minecraft store not working 2021

An experienced gaming content writer who emphasizes on offering the most recent information and how-to tutorials for the trending titles. Being a Hardcore gamer himself, he likes to try an array of games and likes to spend his time exploring them. He likes to unwind by listening to R&B music when he’s not writing about gaming stuff.