
Minecraft is a Lego-inspired role-playing video game in which you may design and construct your own universe. In addition to your avatar erecting blocks in self-defense against critters, the game has evolved to include a variety of other elements.
This is a timeless classic with various distinguishing features. When you’re in Creative mode, you have access to an infinite amount of resources, allowing you to make whatever you want. You’ll be able to travel to new worlds and discover new planets in Survival mode.
To prepare for a monster invasion, you can build a stronghold or stockpile weapons.
As the game progressed, additional content was added on a regular basis. Minecraft users have a multitude of options for personalising and customising the game.
This game is compatible with a variety of devices and platforms. Popular gaming systems include the PlayStation 3, Nintendo Wii, Xbox 360, PC, smartphone, iPad, and Raspberry Pi.
Players of Minecraft, rejoice! For you, we’ve compiled a list of 15 amazing games like Minecraft that are popular among elementary school students.
You may interact with and even change the Terabyte universe in Minecraft. This is simply a small sample of ecological phenomena; it is by no means comprehensive. Today, we are going to discuss How to repair a shield in Minecraft. So, Let’s get started.
How to repair a shield in Minecraft
Shields are a type of tool in Minecraft that is mostly used to shield the player. They are necessary for everyone since they can defend you from most attacks, whether in PvE or PvP.
Arrows enchanted with Piercing, self-igniting TNT, throwable potions, fall damage, Ender Dragon flames, and Vindicator axe attacks are the only assaults they can’t block.
Shields are extremely inexpensive to make, requiring only a few Wooden Planks and a single Iron Ingot. It can be quicker to make a whole new shield than to fix one you currently have.
Repairing your Shield, on the other hand, may be a smart idea if you have enchantments on it or if it has a distinctive design on it. There are two options for doing so. To begin, you can use a crafting bench to combine your damaged shield with another shield. However, any enchantments or patterns will be lost if you do it this way.
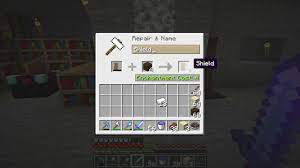
Planks or another shield can be used to repair shields on an anvil. Anvil-repaired shields maintain their pattern. The two shields’ durability is put together, adding an additional 5% durability. There is no pattern on the mended shield.
The alternative option is to put your shield in an Anvil with some Wooden Planks, which will repair it based on how many planks you add. While doing so, you may also name your shield in the Anvil.
Enhancement for Shield in Minecraft
Mending and unbreaking are the two finest shield enchantments. When you acquire experience, mending causes the shield to restore itself. Unbreaking the shield will increase its durability, allowing it to take more attacks.
In Minecraft, creating a custom shield is a breeze. All you have to do is combine a shield and a banner in your crafting table. The flag will be placed on your shield as a result of your action.
In Minecraft, the Shield has just three enchantments, and none of them may be applied using an Enchanting Table. Unbreaking, Mending, and Curse of Vanishing are the three. Unbreaking and Mending are the two you’ll most likely desire, as they both boost overall durability.
You’ll need Enchantments in book form before you can use them. Bring them to an Anvil and combine the Shield and the Enchanted Book to receive an Enchanted Shield back. You also have the option of giving your Shield a unique name while you’re at it.
In Java Edition, you may customise your Shield by attaching banner designs to it. It allows you to easily alter the shield’s colour or add a graphic to the front. When you apply a banner, you may match it to your armour or make it more dramatic by matching it to a clan flag.
Inside a Crafting Table, a single pole with 6 pieces of Colourful Wool on top may be used to make a coloured banner. To begin creating a pattern, place the banner into a Loom. Place the Banner and Shield together at a crafting table once you’re through with the design.
How to use the repaired Shield in Minecraft
You should hold your shield in your offhand to utilise it. To do so, press “E,” which will bring up your inventory. You’ll place the shield in the slot to the right of your player model in the centre of the screen. In Minecraft, this is the offhand slot.
All you have to do now is right-click with your shield in your offhand. Holding right-click causes your shield to appear in front of you. The harm that mobs attempt to inflict on you will now be minimised or eliminated.
Melee assaults, arrow attacks, flaming arrows, tridents, snowballs, eggs, guardian lasers, pufferfish thorns, shulker bullets, fireballs, creeper explosions, ghast explosions, and TNT explosions are all blocked by the Shield.
Your Minecraft character will slow down to a stealthy speed while holding the shield up to prevent any oncoming assaults and negate all damage. A shield has 337 durability points without any enchantments on it.
You can utilise your shield to stop harm from other Mobs now that you’ve mastered how to use one. It may be used to stop a creeper from exploding or to deflect skeleton arrows. Make sure you make a shield so you can protect yourself.
That’s all for today’s article on How to repair a shield in Minecraft. Do check out all the sections and know you should know which games are best for dancing. Till then, stay safe and follow us for more upcoming gaming coverage.
Follow us on Twitter & like our Facebook page for more post-updates
- Top 14 Best Roblox Minecraft Games
- Top 15 Best Games like Minecraft for Android/ iOS
- Fix: Minecraft store not working 2021

An experienced gaming content writer who emphasizes on offering the most recent information and how-to tutorials for the trending titles. Being a Hardcore gamer himself, he likes to try an array of games and likes to spend his time exploring them. He likes to unwind by listening to R&B music when he’s not writing about gaming stuff.