Last updated on July 26th, 2021 at 04:10 pm
Would you want to go on an exciting journey? Would you like to fight against competitors from all across the globe? Or do you just want to talk to your friends online? Roblox is on your side. Every day, you’ll find someone new and interesting due to the community’s expanding library of adventures. Be inventive and showcase your own style!
Roblox is a rapidly expanding gaming network that serves both players and developers. Roblox Studios offers programmers a wide range of customization and powers, opening them to a world of possibilities. Developers love experimenting with new concepts, and it seems that gamers do as well.
Every day, designers create a diverse variety of genres and new games, with only a small proportion of them succeeding due to their original idea. Both gamers and developers are very connected to the Roblox environment. Gamers enthusiastically promote new games, which benefits both developers and designers.
Because of the ever-growing popularity of the Roblox game, players have also become hyper-competitive. As a result of this increase in competitiveness, a lot of players wish to record their gameplay on Roblox and showcase it to others. Today’s article is all about How to record Roblox gameplay. So, let’s get into it.

Also Read: (2021) Top 15 Naruto Roblox Games
How to Record Roblox Gameplay
Roblox is well-known for allowing players to accomplish things on their own. Players could build whatever kind of games they can think of. The sophisticated platform enables you to choose a character and a landscape. You may receive a guide to help you play the game. You may also learn new abilities by visiting the Roblox blog or forum.
You may capture a screenshot or make a video of your favorite pictures or video. And capturing Roblox video is essential. Because of a power-off of your iPhone, you may lose all of your settings before you could even save them. Or you wish to alter a few of your prior settings, but the large job may draw your attention away from the previous gaming.
At this time, you will realize that capturing Roblox video is critical. And for some of you, pictures are insufficient to convey such fluid gameplay as a daring leap from a mountain into a pool of water.
And you may have to film your Roblox video in order to create a lesson to share with others on the web, or you may simply want to watch the wonderful moments again and over. Then you may wonder, “How to record Roblox videos?” Continue reading to discover the solution in the explanations that follow.
Method 1: Record Roblox video using built-in recorder
For all those who are unaware, Roblox features its own built-in recorder that allows players to conveniently record the game. Because of its restricted capabilities, this built-in video capture tool is extremely simple to use. You can use the tool to begin and end recording. Furthermore, you are unable to stop the recording in order to remove any superfluous segments.
Furthermore, the recording mode is the only mode accessible across the entire screen. This implies you can’t record only a portion of the screen. Finally, the recording quality is deplorable. As a result, many players are dissatisfied with the in-game screen recorder and are searching for excellent Roblox screen recorders.
The following are the steps for using the built-in recorder:
- Step 1: Start the game and go to Record Video option.
Go to Menu >> Record tab >> Record Video.

- Step 2: This will start the program capturing your screen.
- Step 3: Tap the Record button to stop the recording.
- Step 4: Your device will save the recorded video.

- Step 5: Go to the My Videos folder
To see the recorded Roblox game footage.
- Step 6: Post the Roblox footage on YouTube,
You may connect your YouTube account and instantly post the video to discuss your tips and tricks and also the footage with other players.
Method 2: Record Roblox video using 3rd Party app
As we’ve seen, the built-in screen recorder has numerous shortcomings and it does not meet the needs of the customer, there is a strong need for an alternative that can help answer the question of How to record Roblox gameplay and video. And we have come across a piece of software that can do this: Demo Creator Screen Recorder.
This free Roblox screen recording program is amongst the most renowned apps among users and offers many benefits. This includes the following:
-Gamers could capture fast-paced games at almost 120 frames per second.

-Throughout gameplay recording, players could assign Markers to key hints.

-Users could capture the whole screen or just a portion of it.

-Users may record system audio, video, microphone, and webcam at the same time.

-People could record voice narration, separate audio while editing and reduce noise.

-You may simply apply fade-in and fade-out effects, as well as adjust the video speed.

-You may obscure the private information or remove the watermark by using the Blur function.

-You may immediately share films to YouTube, Vimeo, Twitch, and Facebook.
Here’s a step-by-step tutorial about using this recorder.
- Step 1: Once you’ve completed downloading this Roblox screen recorder, open the program and choose “New Recording” from the welcome page.
- Step 2: Get started with your gaming. When you’re finished, press the large red button to stop the game recordings. Whenever you begin, you may configure the capture area, mic, and camera frames.

- Step 3: The procedure should begin; you may use the screen sketching tools to label anything at all on the display or use the spotlights to highlight the important location.
- Step 4: Whenever the game is over, hit F10 to stop the recording.

Also Read: (2021) Top 10 Games like PUBG in Roblox
How to record video on Roblox with voice
We have been coming across a lot of questions that show that a lot of Roblox players are clueless about how to screen record Roblox gameplays and videos with voice. So, in this segment, we are going to help you with that.
 Our team suggests using the app – Blu-ray Master Free Online Screen Recorder. It can capture Roblox game footage at up to 60 frames per second. As a result, users may film themselves enjoying Roblox without latency.
In addition to the standard Roblox gameplay recording, you may add a camera overlay and voiceover. Additionally, during capturing, you may activate cursor effects and make comments. As a result, this is a useful tool for gamers.
Film on Roblox for two hours, or even longer without latency. Make a video of a Roblox game including sounds from your PC and microphone.
To manage Roblox recording, configure hotkeys. On Roblox, you may immediately start/pause/resume/stop filming. Get highlight mouse clicks to let viewers easily identify what you do.
- Step 1: Upon setup, launch Blu-ray Master Screen Recorder.
Select Video Recorder to capture a Roblox clip featuring audio.
- Step 2: To define the screen capture region, utilize the red dotted line.
Switch on System Sound afterward to capture the Roblox game sound.
You can also enable Mic if you’d like to make your voice heard via an internal or external microphone.
- Step 3: To capture a Roblox video, use hotkeys or click REC.
You may now begin to play Roblox. To capture a snapshot while filming and playing on Roblox, select Screenshot.
- Step 4: To end filming on Roblox, click Stop.
Select Play in the Preview box to get a sample of your Roblox recorded video.
To expel components, use the built-in video trimmer. Select Save in the bottom right corner to save your Roblox game recording footage.
How to record Roblox on Phone
Since the launch of the mobile version of Roblox, the game is now more popular than ever before. Players are also becoming increasingly skilled on the Mobile version of Roblox as well. So, due to this, there has been a surge in players wanting to record and showcase their Roblox moments on mobile as well.
In this particular segment, we will be talking about How to record Roblox gameplay on your mobile devices. Users may utilize the configured Roblox recorder on iPad, iPhone, and Android to capture Roblox with voice. Here’s how to record Roblox on your smartphone.
- Step 1: Launch the Roblox app.
Select the Menu icon in the upper right-hand corner.
- Step 2: In the game interface, select Record.
- Step 3: Configure the output method.
You have the option of saving the Roblox recorded video to internal storage or uploading it to YouTube.
- Step 4: Tap Record to begin or end recording of Roblox games.
Follow the steps mentioned above and that should answer your queries on how to Record Roblox gameplay on mobile devices.

Also Read: (2021) Top 10 Best Pet games in Roblox
How to record Roblox on Chromebook
Chromebook, which is formally developed by Google, is an operating system designed only to offer continuous internet connectivity.
As previously mentioned, Chromebooks have a different method of dealing with desktop holdings; therefore, to cope with the Roblox gameplay recordings, users should use a web extension then may resume their Chromebook screen recordings quickly.
To make your quest for this kind of web extension easier, we’ve provided you with a well-known and readily accessible Chrome OS plugin that will enable you to quickly and effectively capture your Roblox gaming recordings.
Method 1: Record Roblox gameplay using Screencastify –
 Screencastify is a strong screen recording extension application that allows users to film their Roblox games directly from the Chromebook. Screencastify is a user-friendly application for Chrome OS people, which is why it is regarded as a reliable toolset for players around the world.
It enables you to export your creations to MP4 and a worldwide video format.
Method 2: How to record Roblox gameplay using Loom –
 The Loom screen recorder is a feature-rich and user-friendly Chromebook screen-recording addon. Because this extension is a widely recognized tool for Chromebook systems, it is utilized by a large number of customers worldwide who have the fundamental requirement of producing lessons and material for their YouTube channels.
Loom may also be used for Roblox screen recording since it has a pleasant and user-friendly interface that integrates effortlessly into your Chrome OS.
How to record Roblox on Mac
There seem to be three methods for recording Roblox games on a Mac. Users have the option of using the QuickTime player or a third-party program. The subsequent parts would walk you through each technique step by step.
Method 1: Record Roblox on Mac with QuickTime Player -

The QuickTime player is perhaps the simplest method to record your games. This method, unfortunately, requires you to manually post the footage to YouTube or your chosen video-sharing site.
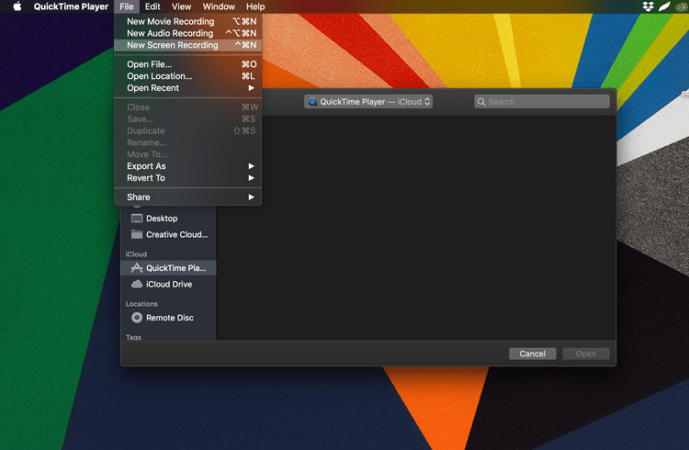
- Step 1: Open the player (hit CMD + Space, type Q, then click enter).
Choose New Screen Recording from the File menu.
- Step 2: To begin, place the recording over Roblox.
On the bottom right-hand side, press the Record button. Switch on your mic by going to the Options menu.
Then, on the bottom right-hand side, click ‘Record.’ To end filming, use Command + Control + Esc on your keypad. Your new recording should show on your desktop promptly.
Bear in mind that users might have to grant the QuickTime player permission to record their screen. To do so, click Preferences and go to the Security and Privacy tab. Then, tick the box next to ‘QuickTime Player.’
Method 2: Record Roblox on Mac with OBS Recorder -
The OBS Recorder is an additional instrument at your fingertips. If you don’t already have it, you could get this free program for your Mac here. To start installing it, choose Mac OS. Then, just follow the on-screen instructions to install and configure it.
After you’ve downloaded the program, launch Roblox and OBS. Then, proceed as follows:
- Step 1: Launch OBS and choose the ‘+’ symbol underneath ‘Sources.‘
A menu will emerge. Tap on ‘Display Capture.’ Then, at the bottom of the pop-up box that opens, click ‘Ok.’
- Step 2: Select ‘Start Recording‘ to begin recording Roblox.
On the right-hand side. Once you’re done, hit the ‘Stop Recording’ button in the same area wherever you started your capturing.
Users might have to adjust their display slightly, and they should click on the microphone icon to capture noises whilst playing. If your display does not show immediately in OBS, you will need to enable rights on your Mac.
To do the same, go to Preferences. Click on ‘Security & Privacy.‘ On the left-hand side, choose ‘Screen recording,’ then tick the box to enable OBS to record on your Mac.
How to record Roblox on iPad
Use the built-in iOS recorder to capture your footage.
Users could use the built-in iOS recorder to film their Roblox games. It’s very simple, and you shouldn’t need to install anything to accomplish it. So, let’s have a look at “How to Record Roblox Gameplay on iPad.”

- Step 1: Start your game.
- Step 2: Next, from the control panel.
Press the recording button.
- Step 3: To capture, your voice, tap and hold the recording button.
In the control center then choose “Mic on.”
- Step 4: Now, have fun with your game.
- Step 5: To end recording, return to the control panel
And press the recording icon once again.
If you can’t locate the recording button in the control center, follow the given steps
- Step 6: On your iOS device, launch the Settings app.
- Step 7: Locate and activate the control center.
- Step 8: Now, locate and add the screen recording option to the control center.
How to Record yourself playing Roblox
Now, a lot of players are often too skilled. So, to showcase their skills and help out other inexperienced players they start streaming. Or, to help others better understand the tips and tricks they are trying to convey, they often show themselves speaking along with the gameplay.
In this segment, we will tell you guys how to record yourself playing Roblox games. Players can record themselves whilst recording their gameplay footage, by using apps like Demo Creator Screen Recorder or Blu-ray Master Screen recorder.
Here are the steps to using the Demo Creator screen recorder to record gameplay in Roblox.
- Step 1: Select “New Recording” from the login screen.
After you have finished installing the Roblox screen recorder, launch and then select thw option.
- Step 2: Click the big red button to halt the game footage.
When you’re done. Before you initially start, you could set the recording area, microphone, and camera settings.
- Step 3: Use the screen drawing tools to highlight anything on the screen
The process should start; you may use the screen drawing tools to name anything on the screen or utilize the spotlights to highlight the relevant area.
- Step 4: When the gameplay is finished, hit F10 to end the video.
You can also use the Blu-ray Master Screen recorder in an almost similar fashion. Just remember to turn on the Webcam in the application when it appears on the screen to activate recording via the webcam.
Conclusion –
Having taken a deeper glance at the game, we conclude that the famous Roblox game requires a decent screen recorder. The built-in recorder has rudimentary and restricted capabilities. Moreover, you cannot stop the video to delete any superfluous segments.
Furthermore, the built-in video recorder’s recording mode is the only choice accessible, suggesting that you cannot record any particular area on the screen. Furthermore, the recording quality is poor.
So, in this article, our team has tried to provide answers to all your queries on how to record Roblox videos and how to screen record on Roblox using mobile devices as well. We surely hope they serve their purpose and make your lives easier!
Follow us on Twitter & like our Facebook page for more post-updates
Check out more Roblox Games –
- Top 10 Best Sports Games in Roblox
- Top 10 Games like PUBG in Roblox
- Top 10 Simulation Games in Roblox
- Top 15 Naruto Roblox Games
- Top 10 Best Superhero Games in Roblox
- Top 10 Best Pet Games in Roblox

Abhigyan identifies himself as a tech geek, gaming cognoscenti, and also a connoisseur of music. Unidentified and mysterious phenomena never fail to gather his undivided attention. When not reading about bizarre and perplexing entities across the Universe, he can often be found cheering for his favorite teams in Football.


