
You might not be able to use your Xbox One console at all due to startup or boot issues. The connected display may display a blank screen, starting errors may be presented, or the console may not load past the green startup screen. These kinds of problems might affect your console’s ability to turn on.
You might not be able to use your Xbox One console at all due to startup or boot issues. The connected display may display a blank screen, starting errors may be presented, or the console may not load past the green startup screen.
These kinds of problems might affect your console’s ability to turn on. This tutorial will offer troubleshooting techniques that might assist in resolving these problems.
Typically, the Error E20XXX is more complicated. So, let’s look at how to use a Microsoft-provided online troubleshooter to fix Xbox One faults and issues in this post.
Here is our guide on (3 ways) Xbox One troubleshoot screen on startup.
Why is Xbox One troubleshoot screen on startup?
Short Answer: Xbox One troubleshoot screen on startup issues can be caused by a number of issues, including software and hardware issues. It typically happens as a result of inaccurate data, network issues, or hardware failure.
A corrupted Xbox hard disc may have read and write issues during gaming, preventing the console from starting up. If the update is stopped or fails to install, the starting error can also show up. If your Xbox system was accidentally switched off while getting an update, the startup problem can show up.
Desynchronization, which can damage or leave data missing on your Xbox console and keep it stuck on startup, is the result of stopping a software update installation midway.
Due to a read-write mistake on the HDD, the console could become unresponsive when it first starts up. Depending on whether you are prepared for a full system wipe or not, factory resetting the console could be able to fix the problem in this case. Sometimes an issue cannot be resolved.
The console is set up to do a system integrity check after an unexpected shutdown, but it could be stopped in its tracks. By pressing three buttons on your controller, you should be able to avoid the integrity check if this is the cause of the issue.
Fix: Xbox One troubleshoot screen on startup
-
Method 1: Using USB drives
First things first, look at the error message or error number under the title “Something went wrong” to start troubleshooting the system update problem. Search for the following three letters if the error code has the letter “E” at the beginning.
Visit the Xbox error code lookup website here and type the error code or status code into the search form to learn more about these error codes. Use the ‘+’ button on the D-pad and the ‘A’ button on your controller to choose ‘Restart this Xbox’ if the ‘Something went wrong’ screen is still displayed to you.
Try the Xbox One System Update Solution to fix additional startup difficulties if you do not see this error message. You may upgrade your console offline using this technique.
As an alternative, you may shut down the system by pressing and holding the Xbox button on the front of the device for around 10 seconds. After that, you may try turning on the system once again by pressing the Xbox button to check whether the issue has been fixed.
To do this, you’ll need the following:
- A computer running Windows with an active Internet connection and a USB port.
- An NTFS-formatted USB flash drive with a minimum of 4 GB of storage capacity.
The majority of USB flash devices are initially formatted as FAT32 and must be converted to NTFS. You must be able to change a hard drive or partition to NTFS format.
Please be aware that formatting a USB flash drive will result in a full erasure of all files and data on it. Before you format the drive, it is important to have a backup of your contents available or to transfer any files on the flash drive.
Now, connect your USB flash drive to a computer’s USB connection and select “Open the Offline System Update file OSU1” to convert your flash drives from FAT32 to NTFS. The console update.zip file will then be downloaded to your PC when you select “Save.”
The next step is to extract all of the file’s contents by unzipping the file’s contents. The $SystemUpdate file from the.zip file should now be copied to your flash drive. Copy the files to the root directory as soon as possible.
The USB flash drive should now be unplugged from your computer, and you can now prepare to run an offline system upgrade.
-
Method 2: Using Xbox Startup Troubleshooter
Your Xbox One game system should be totally shut off by turning it off and then unplugging it. Plug the power cable back in after a little delay.
Now, hold down the EJECT button (on the front of the console) as well as the BIND button (on the left side of the console) while pressing the Xbox button on the console.
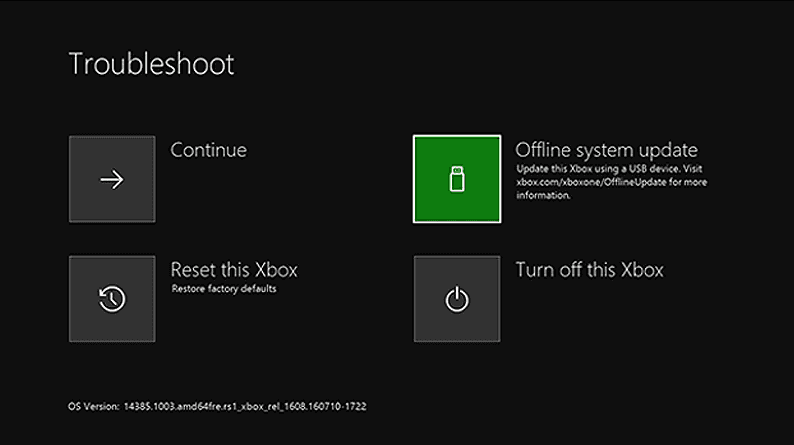
Hold the BIND and EJECT buttons down for a few more seconds until two “power-up” tones may be heard. Release both the BIND and EJECT buttons when you hear the sound. The Xbox Startup Troubleshooter screen should appear as soon as your Xbox One starts up.
Plug the USB flash drive with the offline system update files into an Xbox One USB port as soon as you see the screen. The Xbox Startup Troubleshooter’s Offline system update option will become active as soon as you insert the disc into the computer.
To start the update using the files saved on your flash drive, choose Offline system update using the D-pad and A button on your controller. Your Xbox One S console will restart and take you back to the Home screen after the procedure is finished.
The system can restart many times throughout the procedure. Make sure you reconnect your network cable to the console if you are using a wired connection. To start your system, you must connect your console to the Internet if you have never done so.
Your problem should now be solved. If not, you can attempt this last technique of console reset. To accomplish this, launch the Xbox Startup Troubleshooter once more and do the procedures listed above in the specified order.
Select Reset this Xbox using your controller’s D-pad and A button. Select Keep games and applications when asked to when prompted with a message. The OS will be reset and all possibly damaged data will be deleted with this option, however your games and applications won’t be affected.
-
Method 3: Using Xbox Online Troubleshooter
Try utilising this online troubleshooter, which includes a detailed explanation of your problem and any error messages you may have seen when beginning it, if all the techniques mentioned above fail and you still get this error.
All of these issues, along with error codes 0x803f9007, 0x80bd0009, 0x87e00005, 0x91d7000a, and more, may be fixed with this online troubleshooter.
That’s it with our today’s article on Fix: Xbox One S green screen of death. Do try all the sections and tell us your favorite. Till then, stay safe and follow us for more upcoming coverage.
Follow us on Twitter & like our Facebook page for more post-updates.
Check out more –
-
Fix: ‘Your network is good but there are some Xbox service issues’
-
Fix: ‘Your network is good but there may be matchmaking issues’ Xbox

An experienced gaming content writer who emphasizes on offering the most recent information and how-to tutorials for the trending titles. Being a Hardcore gamer himself, he likes to try an array of games and likes to spend his time exploring them. He likes to unwind by listening to R&B music when he’s not writing about gaming stuff.