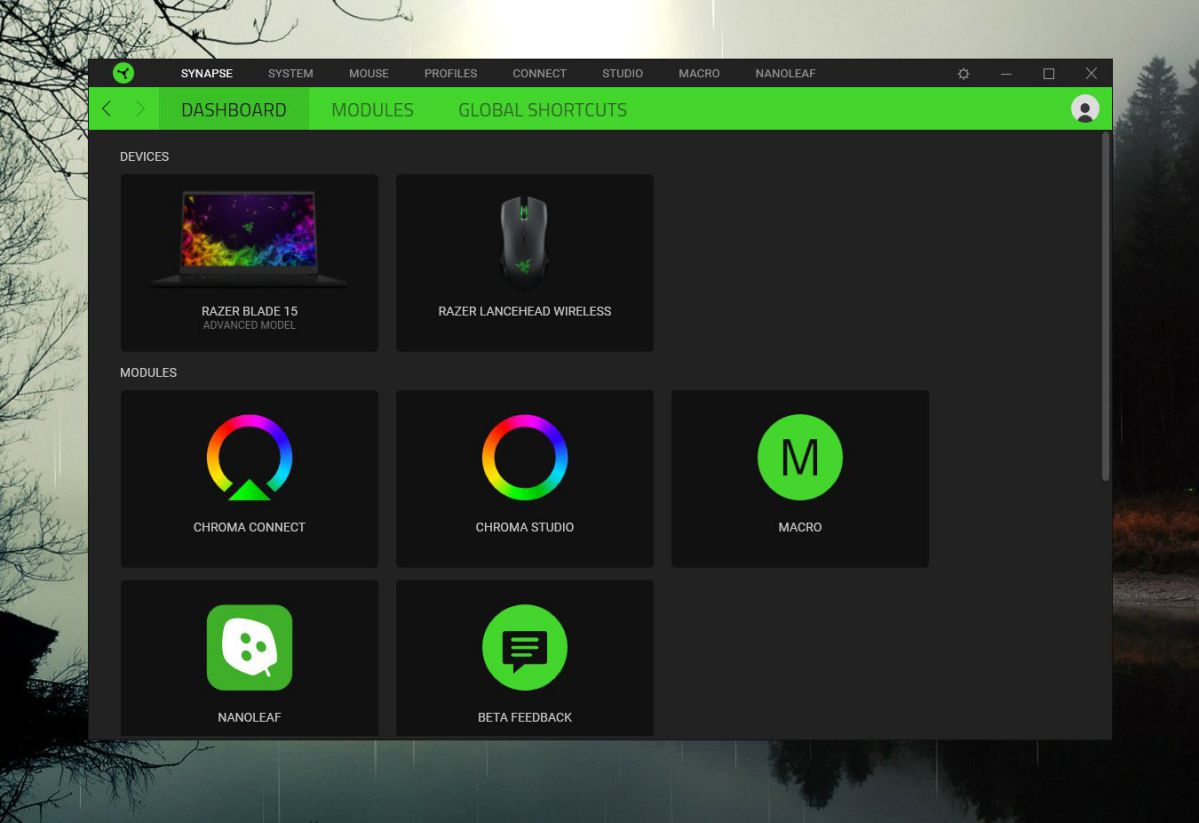

Razer Synapse allows users to quickly and easily reassign buttons and assign macros to their Razer gaming keyboards, mouse, controllers, and headsets. There are a lot of things you can’t change, like the sensitivity or the lighting, without it.
There are occasions when the software has an issue and won’t launch. Fix it immediately using the solutions we’ve outlined in this post if you want to keep using Synapse to manage your devices.
Why is Razer Synapse not opening?
Short Answer: Login problems, conflicts with Razer Surround, firewall and antivirus software, damaged or missing Synapse files, out-of-date drivers and Windows 10 files, and so on may all prevent you from launching Razer Synapse.
Fix: Razer Synapse not opening Windows/ Mac
Method 1: Quit Razer Synapse processes
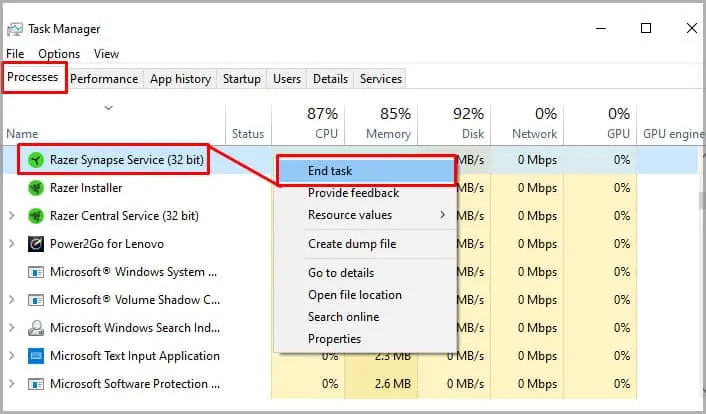
If Razer Synapse won’t launch, it might be because it’s already in use. If you suspect the process is still active, the first step is to launch the Task Manager and verify this suspicion.
- Step 1: Open Task Manager
For Windows press Ctrl + Shift + Esc and for Mac press Cmd + Alt + Esc.
- Step 2: Click on Razer Synapse and then on End Task.
The Razer Synapse process may be terminated by navigating to the bottom of the Task Manager window, selecting it, and then clicking the End Task button.
The problems with the existing procedure will be solved permanently. The next step is to start up Razer Synapse and check whether it works properly. If it doesn’t, read on to learn how to get Razer Synapse 2.0 to launch.
Method 2: Run Razer Synapse 3 as administrator.
- Step 1: Right-click on Razor Synapse.
- Step 2: Click on the Run as administrator option.
Method 3: Get the Latest Razer Device Drivers
Not having the correct drivers installed might prevent the Razer Synapse 2.0 from launching. The connection between hardware and the operating system is facilitated by device drivers. There will be no way to get the device to work if it is missing information, is out of date, or has been corrupted.
Thus, maintaining correctly functioning peripherals necessitates periodically checking the Razer Synapse drivers. Here, we advise making use of a driver updater for Windows in order to instantly update all device drivers.
If you need to update your computer’s drivers, we recommend using Smart Driver Care. With the newest drivers installed, you’ll no longer have to worry about Razer Synapse failing to launch.
- Step 1: Download Smart Driver Care
- Step 2: Click on the Scan Now button.
It will identify all the drivers on your computer that are too old. Using the Pro edition, you may update all of your drivers at once by selecting them and then clicking the Update All option.
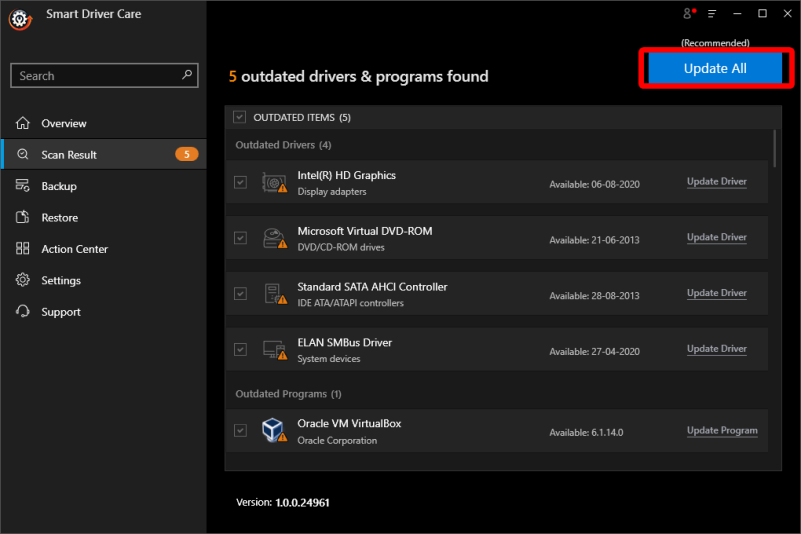
- Step 3: Select the Update Driver button beside the outdated driver.
- Step 4: Reboot your PC to apply the changes.
The newest Razer Synapse driver has currently installed on your computer. If you have been having trouble using Razer Synapse on Windows or Mac, this should resolve the problem.
Method 4: Check if the Razer Services are running
- Step 1: Navigate to “Services”.
- Step 2: Ensure Razer Central Service and Razer Synapse Service are running
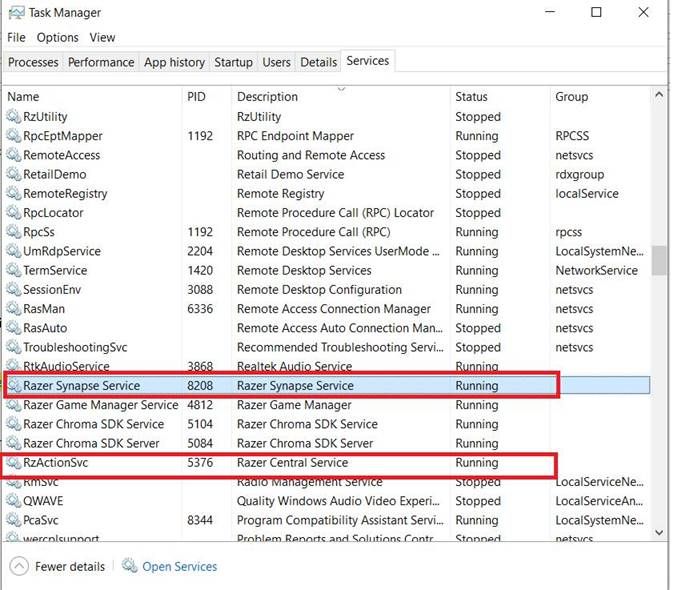
- Step 3: Right-click on “Razer Central Service”.
- Step 4: Click on “Start” or “Restart”.
- Step 5: Repeat the process for “Razer Synapse Service”.
Method 5: Allow Full DiskAccess to Razer
Sometimes drivers utilize obsolete libraries to access the file system and don’t have enough access to accomplish what they need to do with the new secure APFS, thus this is a possible solution if you’re having difficulties getting Synapse to run stably on macOS.
Users have reported that attempting this fix has fixed the previously unsolvable problems of their profiles disappearing after a software restart and the program being utterly unstable.
- Step 1: Navigate to Preferences
- Step 2: Select Security&Privacy
- Step 3: Click on Privacy
- Step 4: Select Full DiskAccess
- Step 5: Add all three Razer services: RzUpdater, RzDeviceEngine, and Razer Synapse.
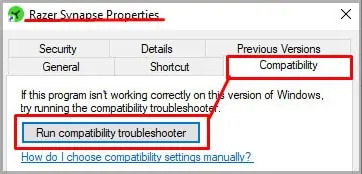
Method 6: Run in Compatibility Mode
It is expected that Razer Synapse will function normally on Windows 10 and 11, however, if you have any difficulties, you may try running it in compatibility mode.
- Step 1: Right-click on the Razer executable file.
- Step 2: Click on Properties.
- Step 3: Select the Compatibility tab.
- Step 4: Select the “Run this program in compatibility mode for” box.
- Step 5: Select the Windows version a step below your current one.
- Step 6: Click on the “Run this program as an administrator” box.
- Step 7: Select Apply.
- Step 8: Click on OK.
- Step 9: Open Razer Synapse.
If the fix does not work, try running the Compatibility Troubleshooter again from the Compatibility tab of the Properties window.
- Step 1: Select Run Compatibility Troubleshooter.
- Step 2: Select Try Recommended Settings.
- Step 3: Select Test This Program.
See whether or not Razer opens. Go to the next step, if it doesn’t.
- Step 4: Click on Next.
- Step 5: Select “No, try again using different settings.”
- Step 6: Select the options that apply to you.
- Step 7: Select Next.
- Step 8: Click on “Yes, try again using different settings.”
- Step 9: Select Next.
- Step 10: Keep following the directions to find the optimum setting.
You can go back into the Compatibility tab in Properties if you can’t find compatibility settings that work and uncheck it before proceeding with other fixes.
Method 7: Get the latest Microsoft .NET Framework installed
Because of Razer Synapse’s reliance on the .NET Framework, the latest version of the program may not launch if it isn’t already installed. When using Synapse 3.0, it is recommended that you have the newest version of the .NET Framework installed, especially if an earlier version is already present.
Get the latest .NET Framework version’s installation helper here. The newest version of the .NET Framework for Windows may be installed by opening the installer.
Method 8: Turn off the Windows Defender Firewall for Razer Synapse
Windows apps are susceptible to interference from third-party firewalls and antivirus software, just like any other program. There are so many Antivirus programs out there, such as Kaspersky and Bitdefender, that it would be hard to provide a comprehensive overview of them all here.
Learn more about your antivirus and firewall by reading the documentation that came with the associated software. In order for Razer Synapse to function properly, there has to be information on how to create an exclusion.
Windows has its own firewall in Windows Defender; it may be necessary to disable it or make an exemption for Razer Synapse. You’ll be relieved to know that this is not only doable but also takes very little time.
- Step 1: In the taskbar look for Windows Defender Firewall.
- Step 2: Select Allow an app or feature through Windows Defender Firewall.
- Step 3: Keep going down until you see Razer Synapse.
- Step 4: Make sure both boxes are checked
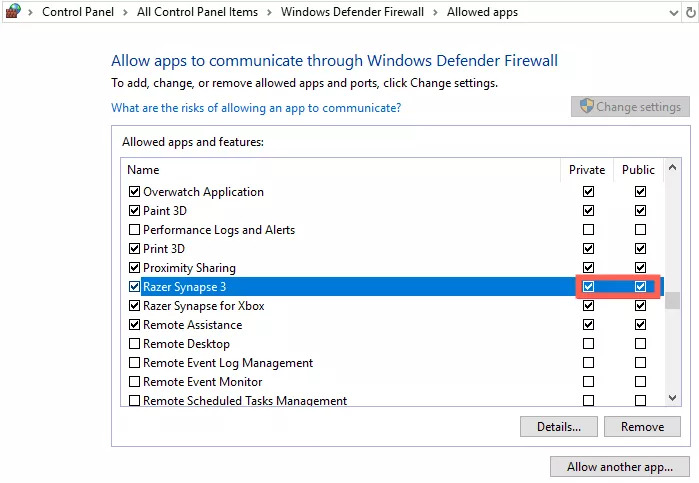
- Step 5: Click on Change settings.
If you want to use Razer Synapse but it isn’t on the list, select Allow another program and then go to the Razer directory.
Method 9: Exit Background Processes
If you have a lot of unnecessary programs and services running in the background, it might prevent Razer Synapse from starting. If you’re having trouble getting Synapse to launch, try closing any active Razer processes and starting again.
For Windows:
- Step 1: Press Ctrl+ Shift+ Esc.
- Step 2: Keep scrolling down to the background processes.
- Step 3: Right-click on a process and click on End task.
- Step 4: Input Msconfig in the Windows search bar
- Step 5: Click on the Services tab.
- Step 6: Click on the Hide all Microsoft services checkbox
- Step 7: Click on Disable all.
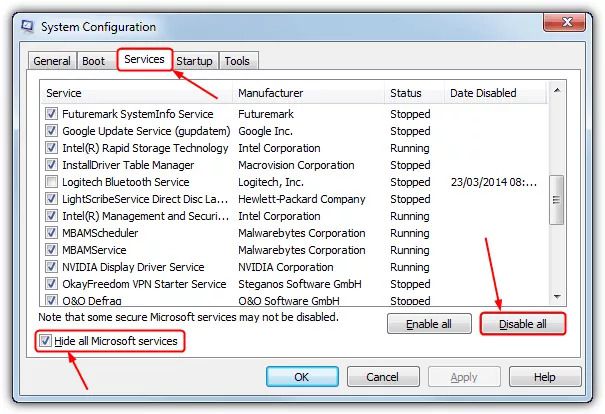
- Step 8: Reboot your PC.
For Mac:
- Step 1: Open the Launchpad
- Step 2: Click on the Other folder, and then Activity Monitor.
- Step 3: Click on the app, service, or activity you wish to close.
By using the Shift key, you can select more than one service at once.
- Step 4: Click on the X button at the top and select Force Quit.
Method 10: Erase Temporary Files
When a program is ended, any temporary files it may have created are typically removed. However, these files aren’t always removed, leading to incompatibilities with other programs. If your computer has recently crashed or unexpectedly restarted, it’s possible that temporary files have been left on your Razer Synapse 2, which will need to be deleted.
For Windows:
- Step 1: Input Run into the Windows search bar
- Step 2: Click on the Run dialog.
- Step 3: Enter %temp% and select Ok. A folder will open.
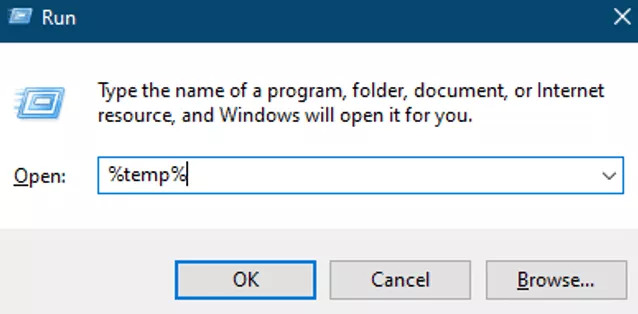
- Step 4: Select all files by pressing Ctrl+ A.
- Step 5: Select delete.
- Step 6: Reboot the PC.
For Mac:
- Step 1: Remove all active apps
- Step 2: Launch Finder
- Step 3: Select Go in the menu bar
- Step 4: Navigate to Folder
- Step 5: Input ~/Library/Caches/

- Step 6: Highlight the temporary files to be deleted
- Step 7: Put the chosen files in Trash.
- Step 8: Finally, empty the Trash folder
Method 11: Update your system software
Razer Synapse not starting? Try updating your system. Even though most updates will install themselves, it’s important to always be running the most recent version of your operating system in case you miss one.
For Windows –
- Step 1: Click on Start
- Step 2: Select Settings
- Step 3: Select Windows Update
- Step 4: Click on Check for updates.
- Step 5: Install the update available.
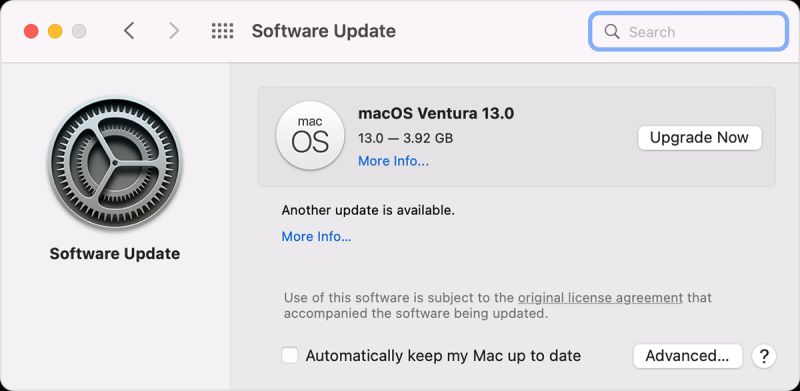
For Mac –
- Step 1: Select System Settings.
- Step 2: Select General in the sidebar
- Step 3: Select Software Update on the right.
- Step 4: Select System Preferences.
- Step 5: Select Software Update.
- Step 6: Select the Update Now or Upgrade Now button to install it.
If prompted, type in your password to get administrative access. You may see a progress bar or a blank screen many times throughout the installation process, and your Mac may restart.
Method 12: Uninstall and Reinstall Razer Synapse and Razer device drivers
If Synapse 3 or X won’t launch, try updating your Razer device drivers. In this case, just uninstall the Razer software and drivers from your computer, and then reinstall them using the instructions provided below.
- Step 1: Press the Windows key + X.
- Step 2: Select Settings.
- Step 3: Select Apps.
- Step 4: Highlight Razer Synapse to view the options.
- Step 5: Select Uninstall.
- Step 6: Select Yes.
- Step 7: Select Uninstall.
- Step 8: Select Select All.
- Step 9: Select Yes, Remove.
- Step 10: Select Close.
- Step 11: Delete all Synapse files.
Synapse data may also be stored in the following places. Remove any that you see.
- Step 12: Reboot your computer.
After uninstalling Synapse, Razer suggests using System File Checker to fix any corrupted system files.
- Step 1: Press the Windows key + X.
- Step 2: Select Windows PowerShell (Admin).
- Step 3: Select Yes.
- Step 4: Input “sfc /scannow”.

- Step 5: Press Enter.
- Step 6: Wait till the process is complete.
- Step 7: Reboot your computer.
Get the newest version of Razer Synapse and set it up on your PC.
- Step 1: Download the recent version of Razer Synapse.
- Step 2: Select the downloaded file.
- Step 3: Select Razer Synapse and not Razer Cortex.
- Step 4: Select Install.
Method 13: Make a new Razer Synapse user account
Users of Razer Synapse have speculated that starting again with a fresh account might solve the issue. You can only have one Razer account per email address, so you’ll need to create a new one if you want to switch accounts.
- Step 1: Select Sign Up.
Click Sign Up after a clean installation of Razer Synapse.
- Step 2: Enter your new Razer ID and a new email address.
- Step 3: Input a new password and click Start.
- Step 4: Accept the terms and conditions.
- Step 5: Go to your email inbox.
- Step 6: View Razer’s verification email and tap on the link.
- Step 7: Click Next.
Razer Synapse will open on its own.
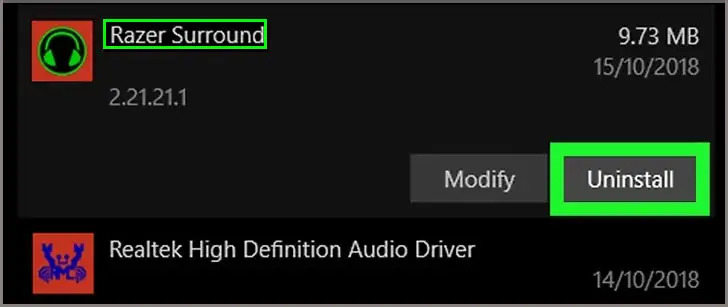
Method 14: Uninstall Razer Surround if you have it
- Step 1: Press Windows + R to open Run.
- Step 2: To open a window, type appwiz.cpl into Run’s text box
- Step 3: Select OK.
- Step 4: Choose Razer Surround,
- Step 5: Select Uninstall to remove it from Windows.
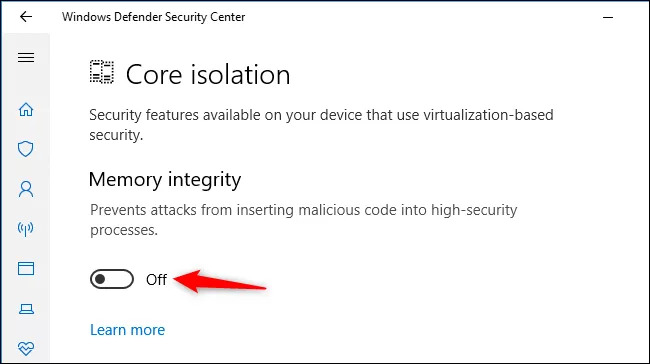
Method 15: Turn off Windows Core Isolation
Microsoft developed a technology called Core Isolation a few years ago to isolate critical system programs and data in their own private region of memory in Windows 10. On occasion, this may have undesirable results, such as preventing the launch of Razer Synapse 2 and later.
- Step 1: Enter Windows Security in the Windows search bar.
- Step 2: Choose Device security.
- Step 3: Select Core isolation details.
- Step 4: Turn off Memory Integrity.
Follow us on Twitter & like our Facebook page for more post-updates.

Abhigyan identifies himself as a tech geek, gaming cognoscenti, and also a connoisseur of music. Unidentified and mysterious phenomena never fail to gather his undivided attention. When not reading about bizarre and perplexing entities across the Universe, he can often be found cheering for his favorite teams in Football.